Creating a Basic Opportunity
An opportunity can be created as a Basic opportunity if it is happening at a single location.
Otherwise, the opportunity must be created as an Advanced opportunity.
Navigation
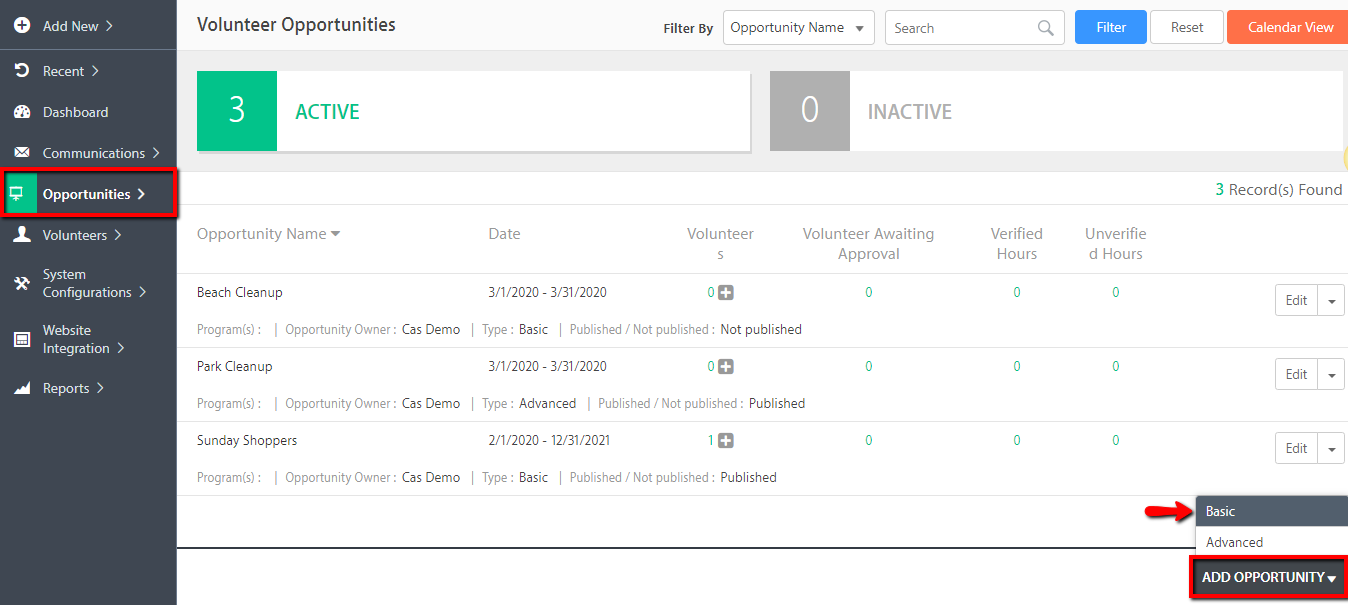
From the Main Menu, click Opportunities then Our Opportunities. On the Volunteer Opportunities page, click the Add Opportunity button at the bottom right, then select Basic.
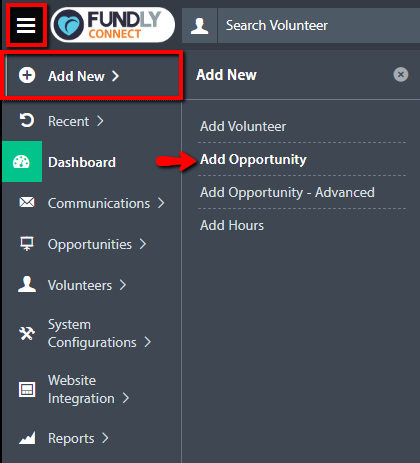
Alternatively, you can click on the Main Menu, click Add New then select Add Opportunity.
Configuration
The basic opportunity configuration has 5 steps.
Step 1 Basic Info
Complete the required information to proceed to step 2.
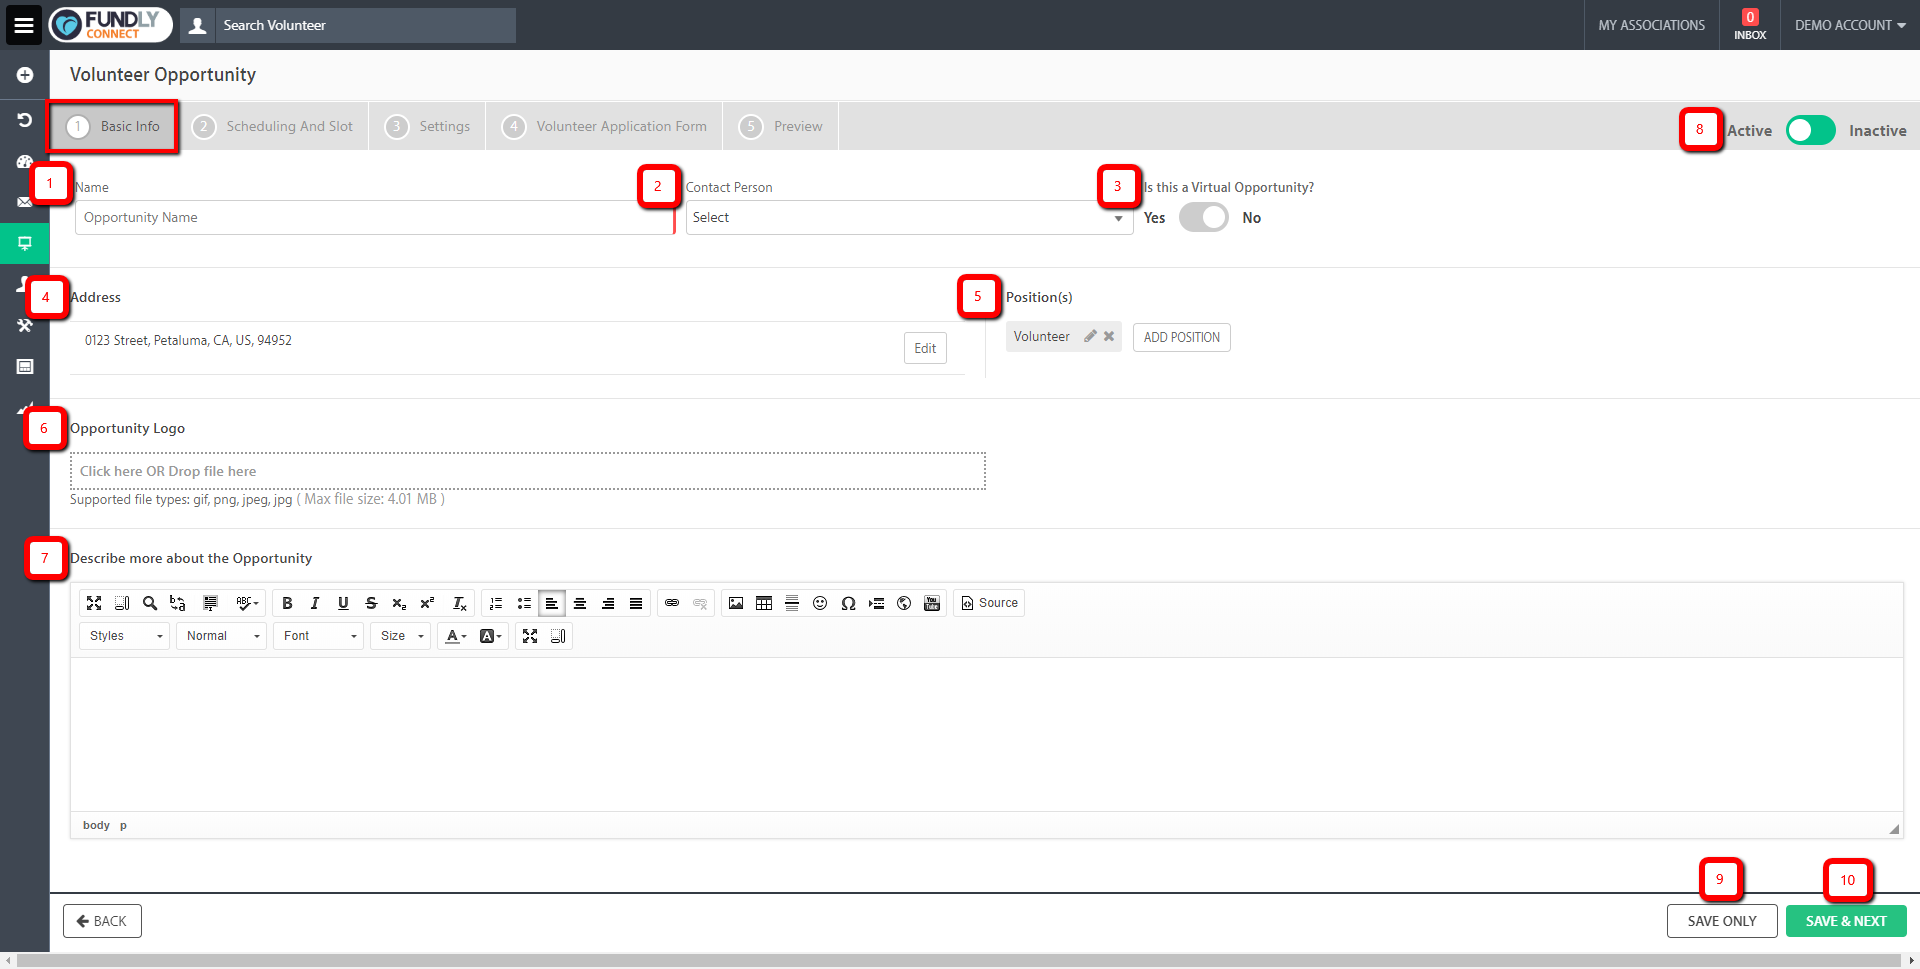
- Name – Name of the opportunity.
- Contact Person – The organization admin/user who is assigned to the opportunity. This user will receive email notifications specific to the opportunity such as volunteer opportunity application.
- Virtual Opportunity – Set to Yes if the opportunity doesn’t have an actual location.
- Address – Venue of the opportunity. By default, it is set to the organization’s address.
- Position(s) – Multiple positions can be configured.
- Opportunity Logo – This logo is going to be displayed on the public site.
- Describe more about the opportunity – Where the details of the opportunity are listed such as information about the activity, things the volunteer must know or bring before participating, or other specifications particular to the opportunity. This information can be read both on the opportunity posting and on the volunteer application confirmation email.
- Active/Inactive – Set to Inactive if the opportunity is no longer active and should be removed from the public site.
- Save – Save any changes on the page.
- Save & Next – Save any changes and proceed to the next step.
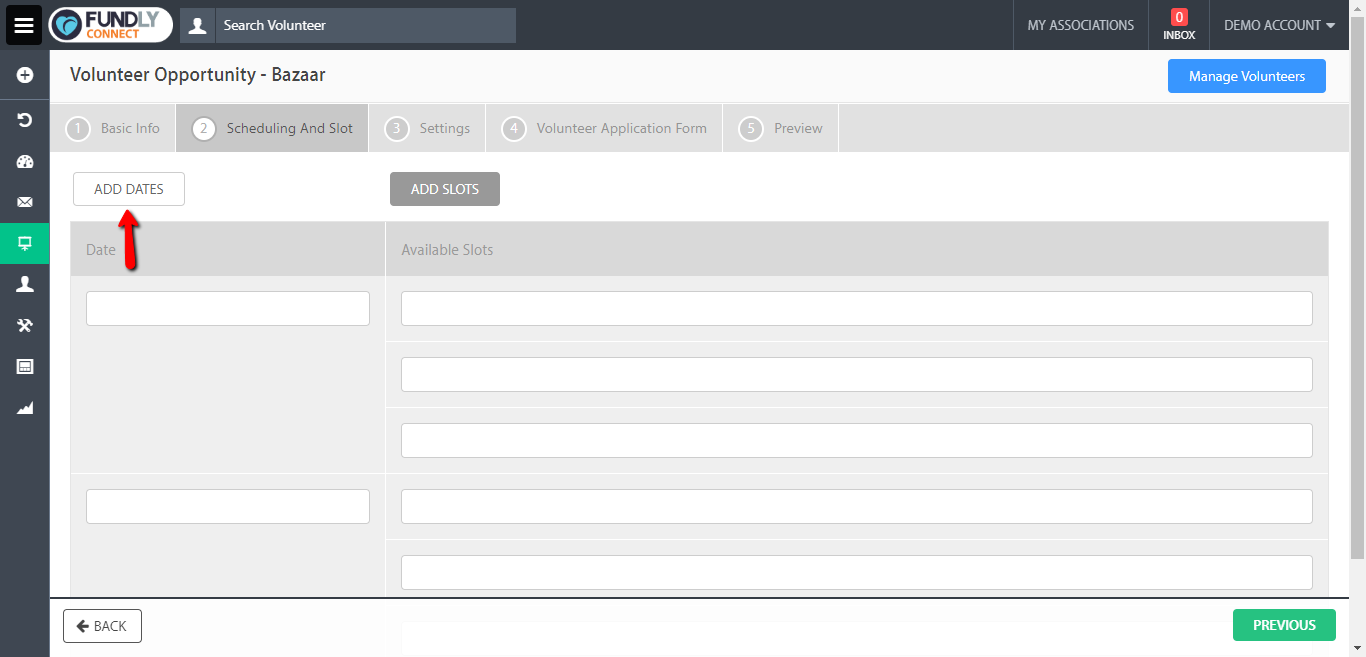
Step 2 Scheduling and Slot
1. To add dates, click Add Dates.
2. On the Add Schedule Dates pop-up, select 1 from the 4 scheduling types and enter the dates.
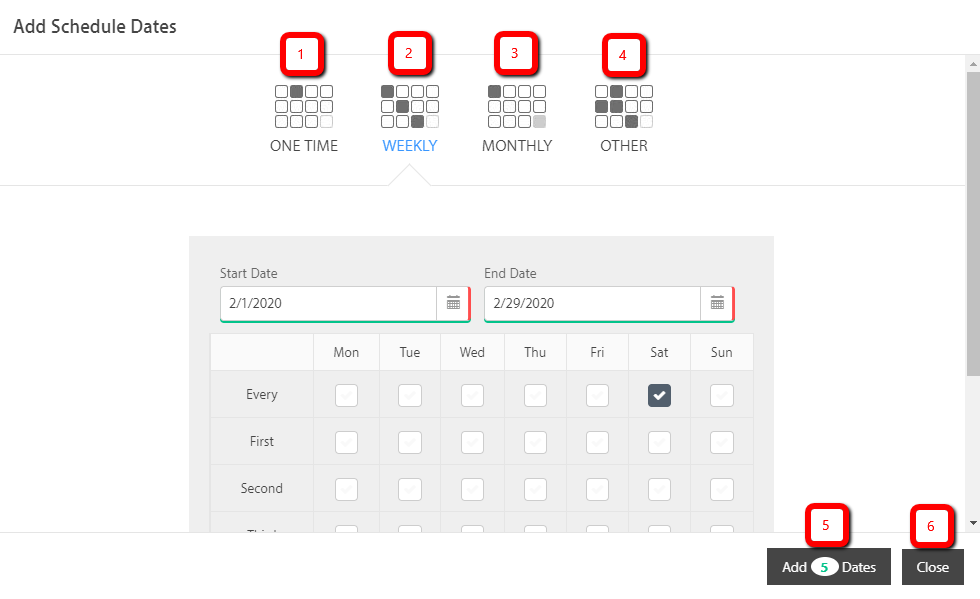
- One Time – Single date occurrence
- Weekly – Recurring schedule type. Enter the date range then select the recurring days (ongoing, every MWF, first Sunday of the month, alternate Saturdays)
- Monthly – Recurring at a specific date of the month (every 4th of the month)
- Other – Random dates. Select each date manually and click Add
- Add {No.} Dates – Calculates the total dates of the schedule. Click to add dates.
- Cancel – Click to cancel and close.
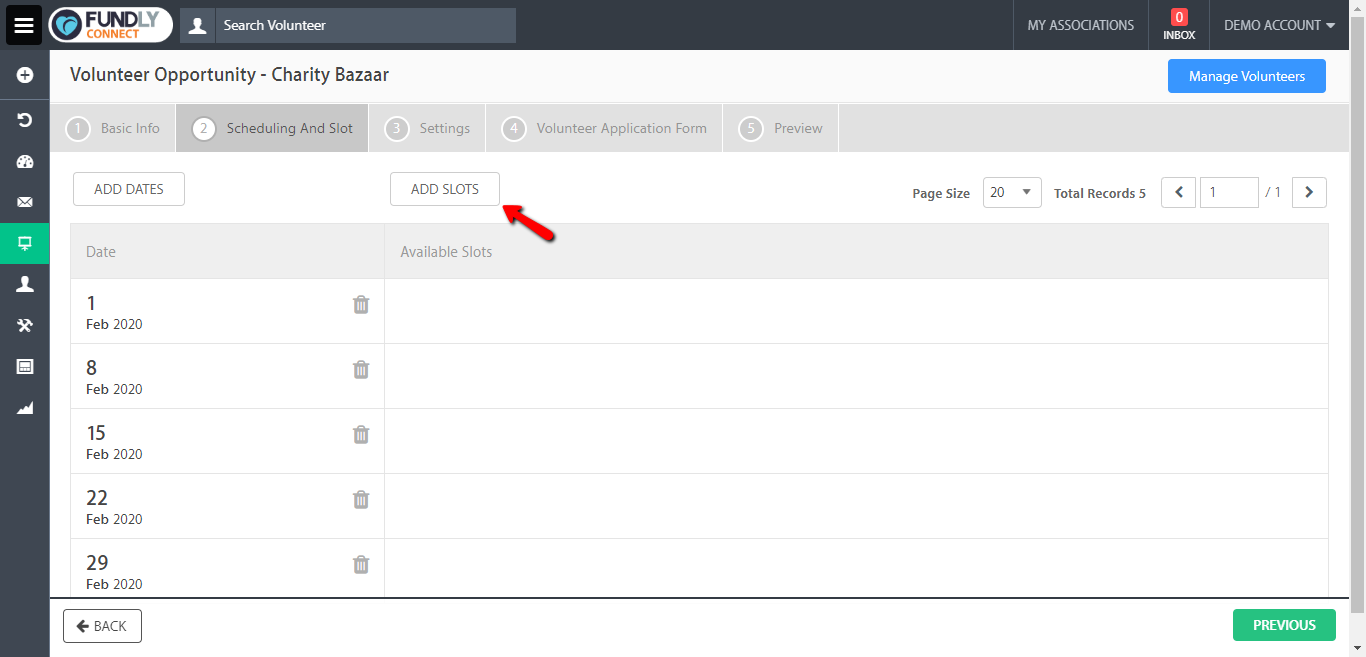
3. Once the dates are added, they will populate the Date column of the table.
4. Click Add Slots to setup the slot time(s) for these dates.
5. Complete the information on the Slot pop-up.

- Slot Name – Name of the slot/shift
- Slot Dates – Select one/multiple/all dates to which this slot will apply
- Flexible Time – Set to Yes if volunteers can come in at any time of the day
- Start/End Time – If not flexible, specify the start and end time of the slot/shift
- Position(s) – Select which position(s) are required for this slot
- Capacity – Limit the number of volunteers who can schedule for a slot. Zero means unlimited capacity.
- Save – Save the slot and close pop-up
- Close – Cancel and close pop-up
6. Once the slot is saved, they will populate the Available Slots column of the table.
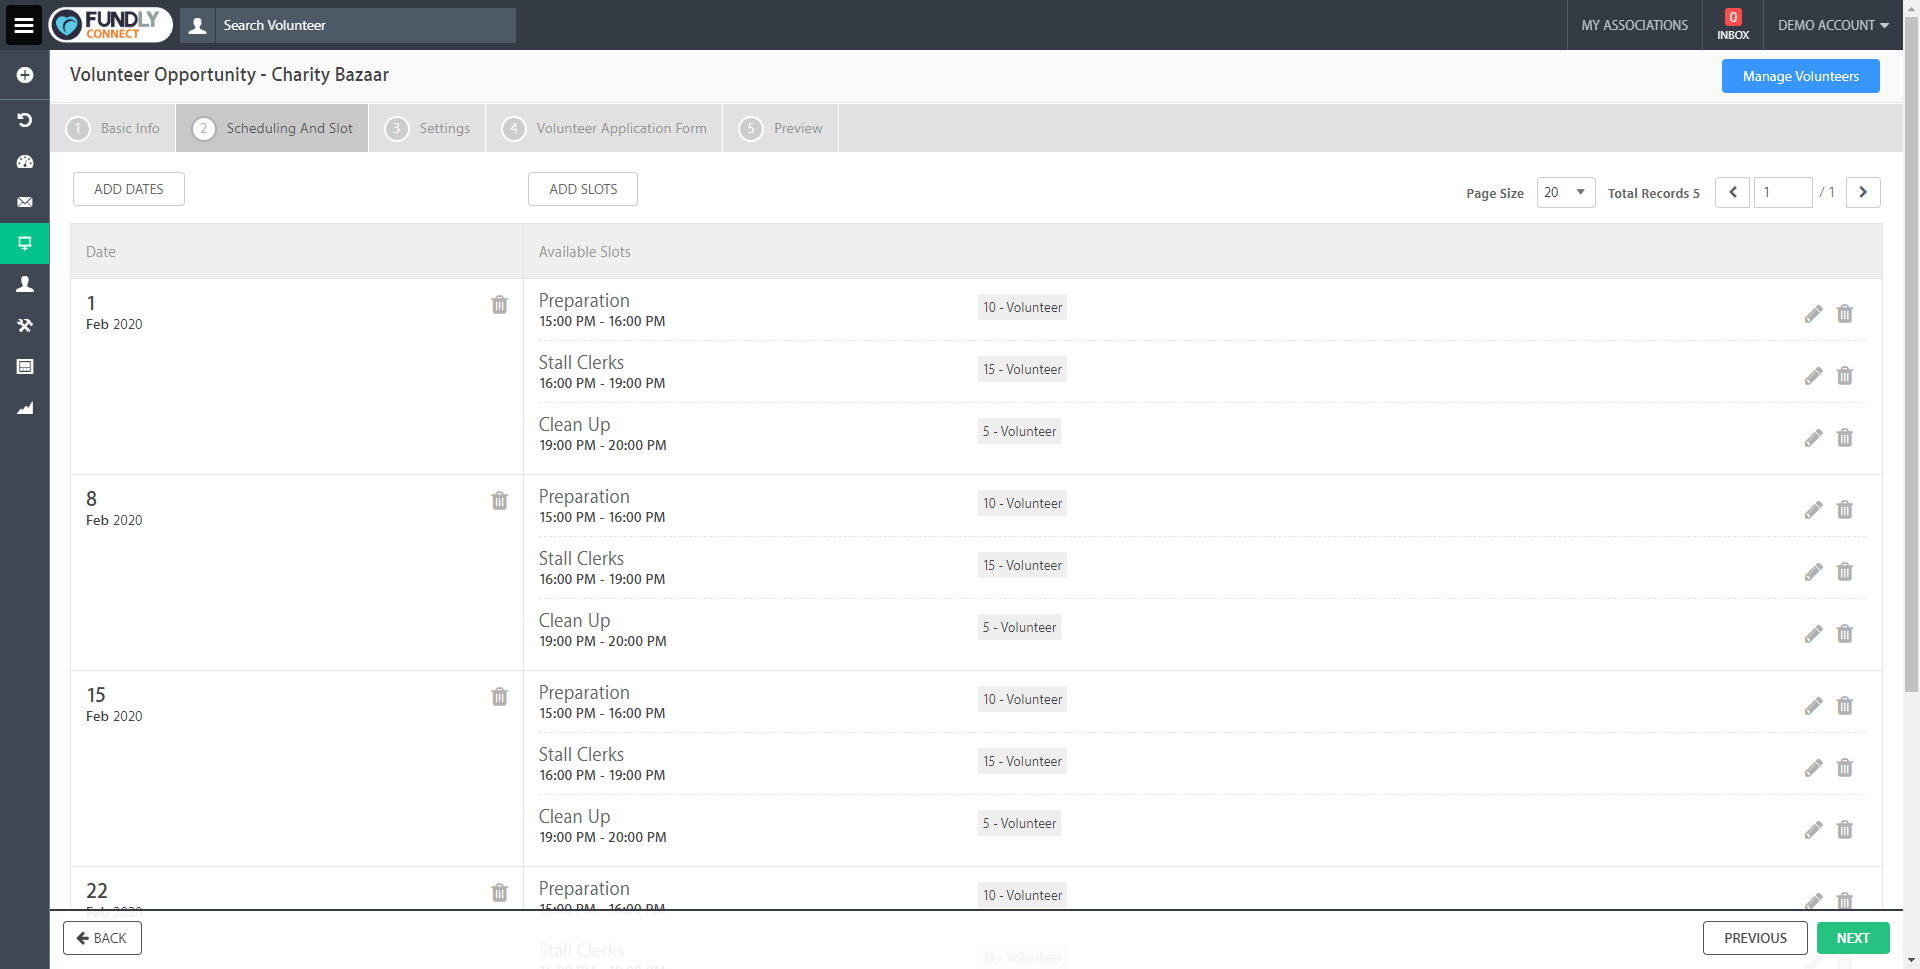
- Edit icon will edit the particular slot.
- The Delete icon will delete the particular date/slot.
Note:
- A slot must be created for each date for the latter to be active.
- Deleting a date will delete its associated slot(s).
- Deleting a date/shift with associated hours is not possible.
- Deleting a date/shift with scheduled volunteers will trigger a notification.
Step 3 Settings
Complete the required information to proceed to step 4.
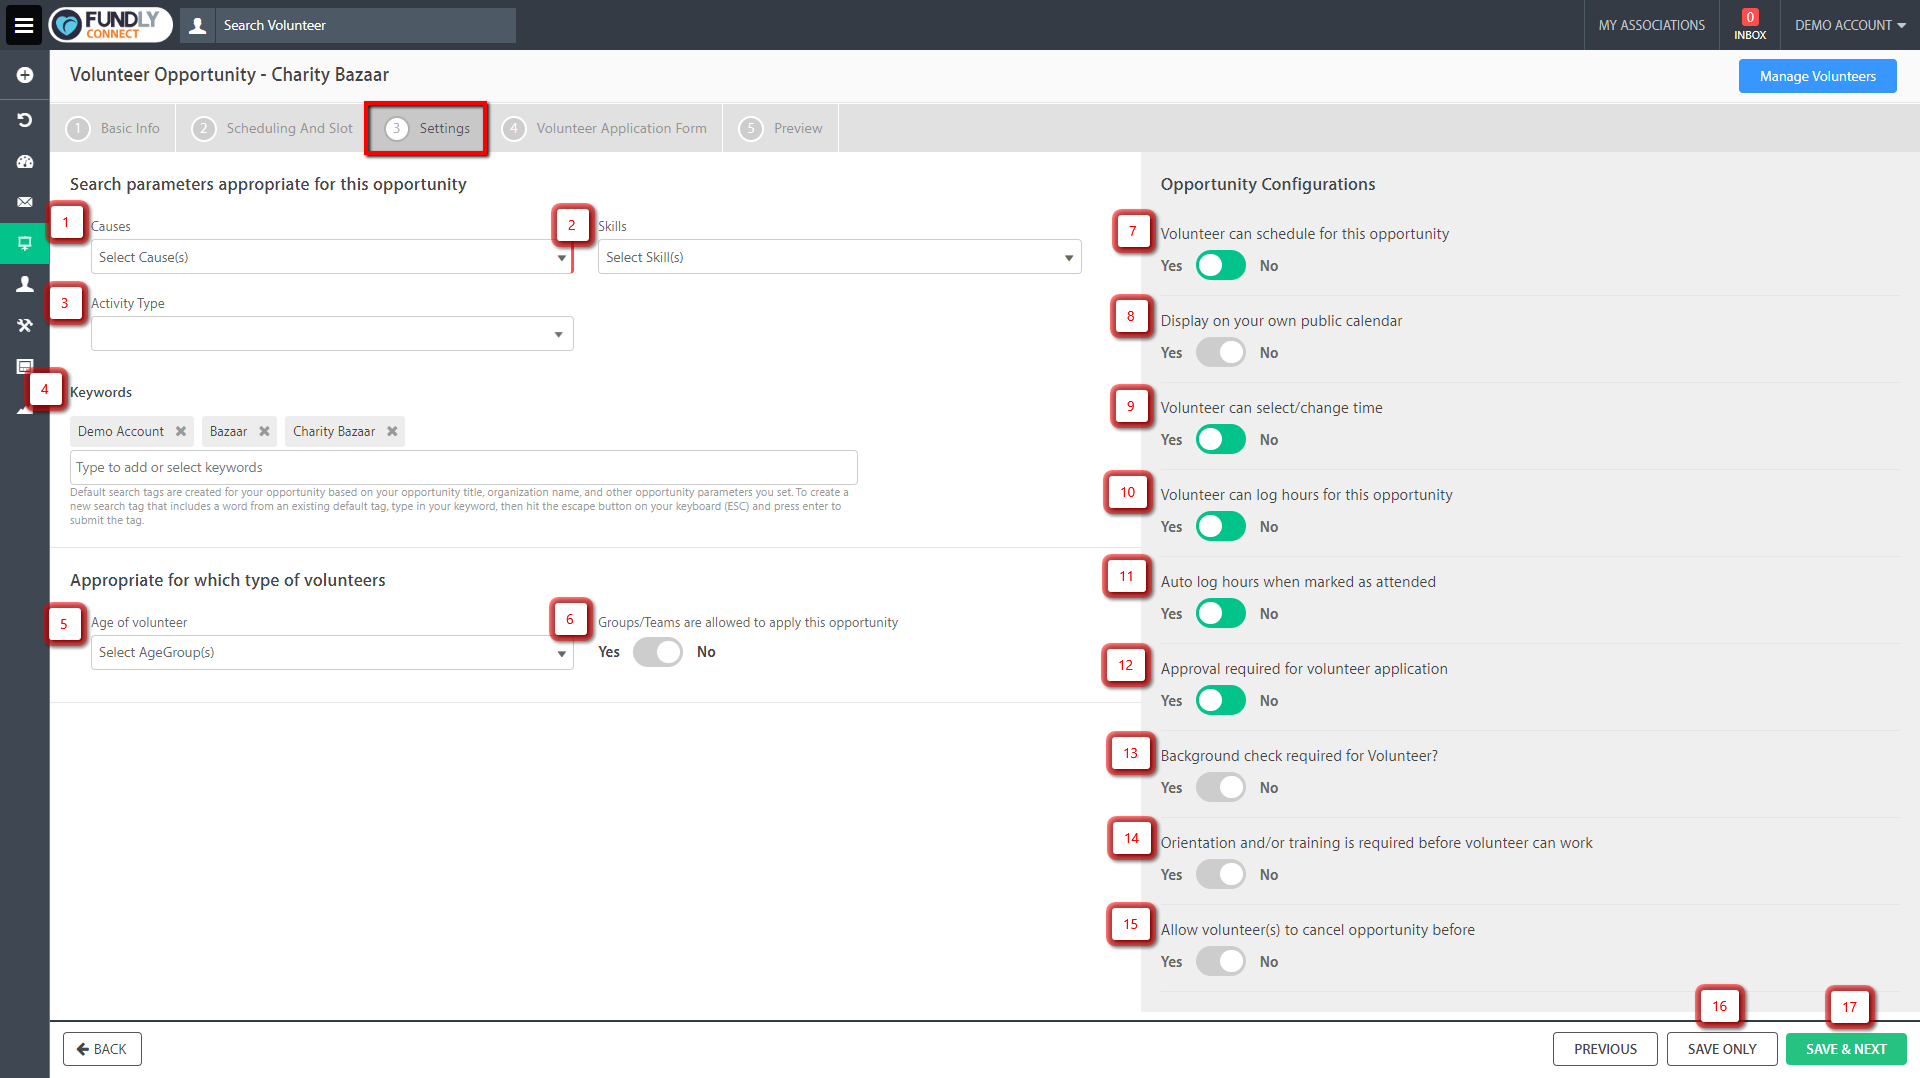
- Causes – Causes that the opportunity serves
- Skills – Skills required for the opportunity
- Activity Type – Types of activities that the opportunity involves
- Keywords – Words that can help volunteers search for the opportunity online
- Age of Volunteer – Age group of volunteers required
- Groups/Teams are allowed to apply – Turn on if groups/teams are allowed to apply. Otherwise, only individual volunteers are allowed to apply for the opportunity.
- Volunteer can schedule – Turn on if volunteers are allowed to schedule from their volunteer portal
- Display on your own public calendar – Turn on if you want to display the opportunity on your calendar
- Volunteer can select/change time – Turn on if volunteers are allowed to select a time within the time range when scheduling for the opportunity
- Volunteer can log hours – Turn on if volunteers are allowed to log their own hours from their volunteer portal
- Auto log hours when marked as attended – Turn on if hours should be automatically logged when marked attended from the Attendance page or on the Time It add on
- Approval required – Turn on if admin approval is required for volunteers applying for the opportunity
- Background check required – Turn on if an internal background check by admin is required before a volunteer is approved for the opportunity
- Orientation and/or training required – Turn on if an orientation/training is required for approved volunteers. The orientation/training must be configured within the database.
- Allow volunteer(s) to cancel opportunity – Turn on if volunteers are allowed to cancel a schedule for the opportunity
- Save only – Save any changes to the page
- Save and Next – Save any changes and proceed to the next step
Step 4 Volunteer Application Form
Your organization may require that volunteers fill out an application form when they apply to an opportunity. Application forms can be created separately, or created during opportunity configuration. Follow the Application Form tutorial for the steps in creating the form separately. To create specialized fields to add to your forms, follow the Custom Datasets tutorial before proceeding.
On step 4, select whether you want to create a new form or select form existing forms.
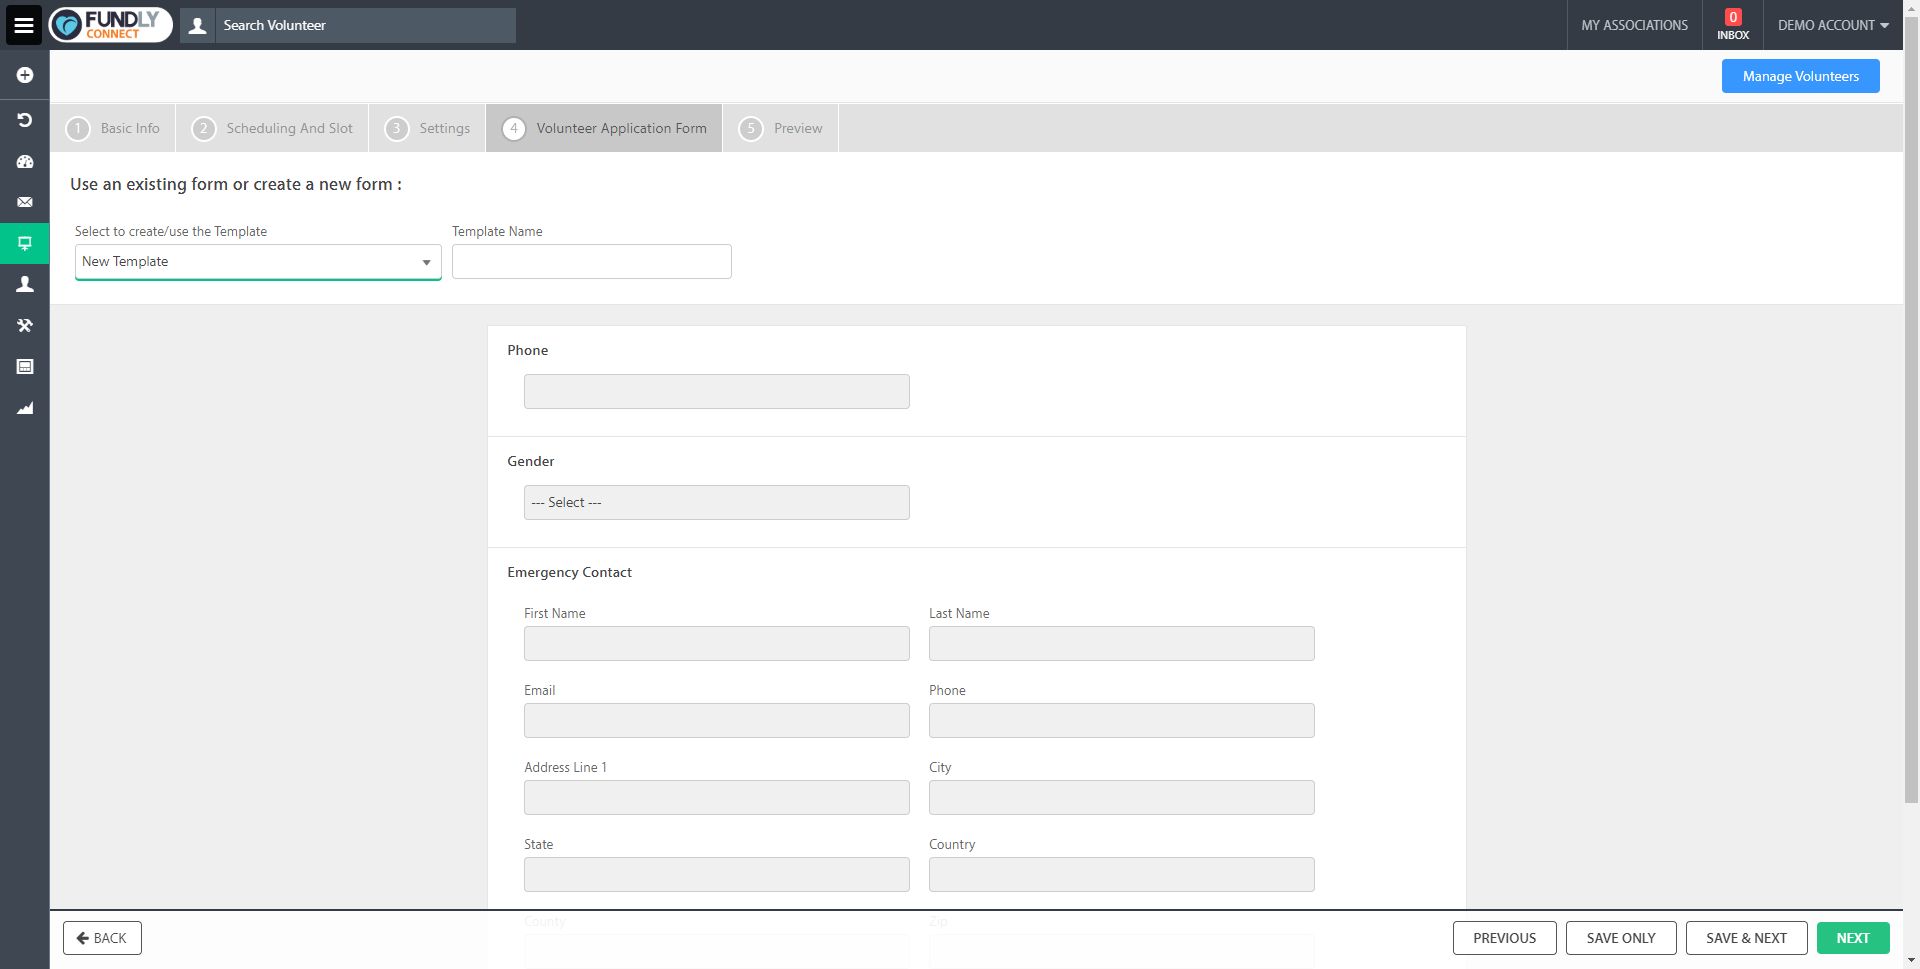
Click Save & Next to proceed to the next step.
Step 5 Preview
Click Publish to publish the opportunity on your public site.
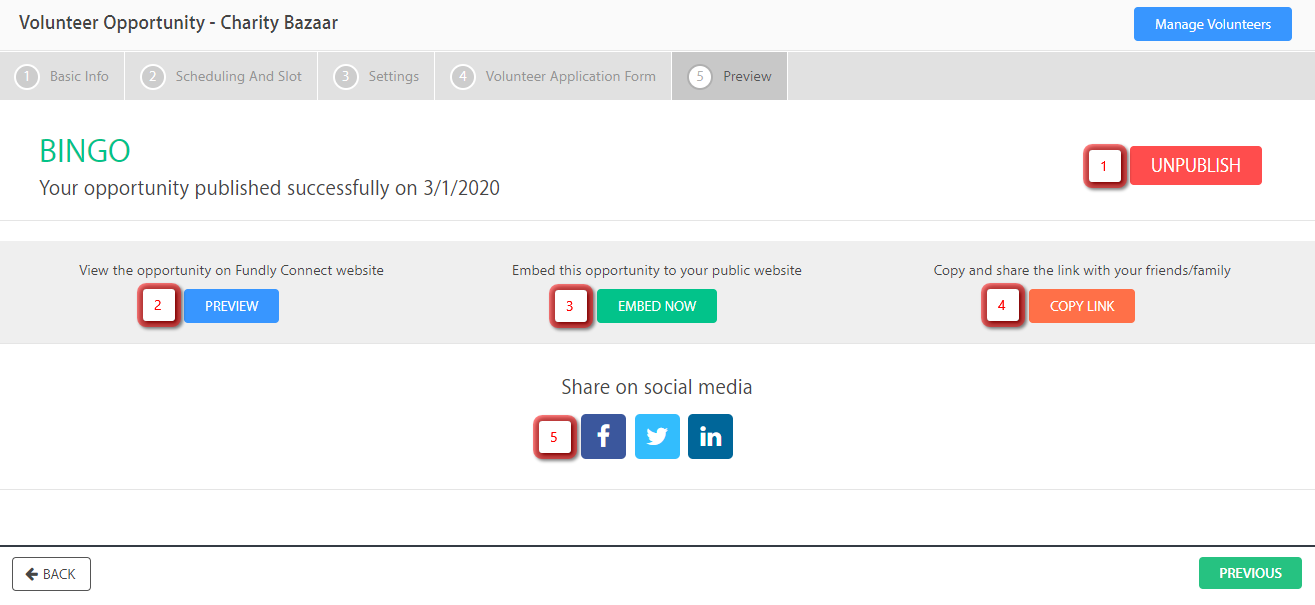
- Publish/Unpublish – Displays/Hides the opportunity on your public site
- Preview – Opens a new tab to preview the opportunity page
- Embed Now – Displays the Opportunity Widget Script which you can embed on your website
- Copy Link – Copies the URL of the opportunity page to share
- Share on Social Media – Allows you to share the opportunity on social media
[For partner organizations]
If you wish to publish this opportunity on a VAC or a university’s public site, click Publish/Send for Approval and Publish next to the VAC or university name under 'Publish/Unpublish to Action Center'.
Note: In order for your opportunity to be visible to the selected VAC or university's community of volunteers, you must complete this step.
If you are associated with any of the VAC or university’s Programs, they will appear below its name. If this opportunity is linked to a particular program, check the box next to its name.
If you wish to publish this opportunity on the VolunteerEasy page (https://www.volunteereasy.com/) as well, set the date on which you wish to publish this opportunity on the Publish Date field, then click Publish.
Comments
0 comments
Article is closed for comments.