Team Feature
For Nonprofit Organizations
- Creating Teams
- Adding Team Members
- Adding Member from the Backend
- Allowing Volunteers to Join Team Online
- Assigning the Team to an Opportunity
- Scheduling the Team From Team Profile
- Scheduling Team Members
- Logging hours for Team/Members
Creating Teams
Team accounts can only be created on the organization’s public site. Team captains register their teams online and manage their accounts by logging into their Team Dashboard/Account.

Adding Team Members
Adding Member from the Backend
As the organization, you can add Members to the Teams registered in your database. One place where you can add Members is on the Team’s profile. On the ‘Team Members’ section, click on the ‘Add Team Member’ button.

It will open the ‘Add Team Member’ pop up where you must enter the member’s name. If that member is already in your database, it will display the matching record on the dropdown. Otherwise, the system will require you to add the new member in the database first.

Members successfully added are listed on the ‘Team Members’ section of the Team Profile.

Another place where a member can be added to a team is on the volunteer's manage profile page.

Allowing Volunteers to Join Team Online
Another way for volunteers to become members of a team is by joining "Public" teams. Teams will have the option to become public which will allow volunteers to apply online. Also, they can require approval before volunteers become official members.
Note: Volunteers will be required to register/login a volunteer account first, before they can join public teams.
In order for volunteers to join online, the public site admin must add a new Menu Item which is the "Team List". First, go to your Website Configuration by clicking 'Design My Public Site'. Next, click the 'Teams' tab to configure that page.
Click the 'Edit Template' (orange) button, then the edit icon on the sub-menu to add/edit/delete sub-menu items.

On the Add Edit Menu pop-up, click 'Add New Menu Item'. Select 'Team List' as the menu type, name and title then hit Save.

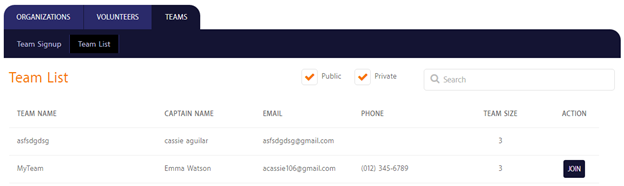
Once you click Preview, you should now be able to view the 'Team List' sub-menu where all teams are listed. That is also where volunteers can apply join the teams that are "Public".
Assigning the Team to an Opportunity
Before you can assign a team to an opportunity, make sure that the team is registered in your database. On your Opportunity list, click the plus (+) sign of the opportunity to assign team. A pop up will come up where you’ll have to enter the team name on the field. It will pull up the matching record which you can select. Lastly, click on ‘Assign Volunteer’.

Another place where you can assign a team to an opportunity is on the Team Profile. Click on the ‘Opportunity List’ tab, and then click on the opportunity list dropdown to select the opportunity. Enter the Team Size then hit the ‘Assign’ button.

Scheduling the Team from Team Profile
A team can be scheduled on the ‘Manage Volunteers’ page of the opportunity.

Scheduling can also be done on the Team’s profile.

Once you click on the ‘Scheduling’ link, it will open the Scheduling window. This is where you select the Venue, Shift and Position for the team. At the bottom is where you can select the date/s that the team is volunteering. You can either manually choose available dates or schedule by ‘Day of Week’ (e.g. Every Monday). Hit Save.
Scheduling the Team Members
After scheduling the team, you can now schedule its members. In order to do that, you must select ‘Edit/View Schedule’ of the scheduled opportunity.

This will open the ‘View Schedule’ window with the team’s schedule. Click on the dropdown then select ‘Team Member Schedule’.

Again, it will open the Scheduling window for you to schedule the member. You’ll only need to select which member you are scheduling. As for the date/s, you can only schedule the member for date/s within the Team’s schedule.
After you have saved, the Team Member’s schedule will be displayed below the Team schedule.

Logging Hours for Team/Members
As the admin, you can also log hours for the team and/or its members. Logging hours can be done in two ways: entering hours or taking attendance.
a) By Entering Hours
Logging hours by entering hours can be done from different pages:
i) Team Profile

i) Opportunity - Manage Volunteers

When logging hours, you need to specify whether you are logging hours for the entire team or its member/s. You need to select the Assignment, Date then enter the hours with or without description.
As what is noted on the screen, "Adding hours for the Team will be reflected for the Team only. Adding hours for Team Members will be reflected in that team member's profile, as well as overall Team's profile."


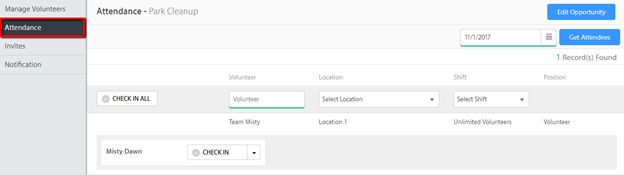
b) By Taking Attendance
Taking attendance is done by "checking in" the team/members. Once you check them in, the number of hours scheduled for that shift will automatically be credited to the volunteer.
Comments
0 comments
Article is closed for comments.